Prep Time
25mins
Cook Time
30mins
Makes
1
Difficulty
Medium
Method
Recipe created by Dan Beasling-Harling:
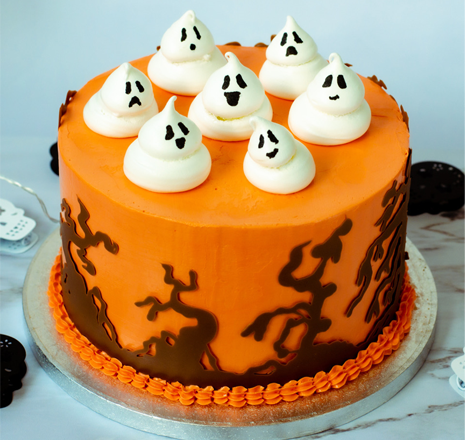
"This Halloween themed cake was inspired by my love of autumnal Pumpkin spiced lattes.
I figured that children probably wouldn’t go for that coffee flavour though, so I contrasted the spiced pumpkin cake with a classic vanilla buttercream instead. And I’m glad I did, because this tastes just wonderful!
I just love the cute little ghosts and spooky forest surrounding the cake - they just scream Halloween, don’t they?!
You could just skip all the decoration of course, the cake’s delicious as it is, but I think it adds something really special!"
- Preheat the oven to 180c/160c fan.
- Grease and line three 20cm/8-inch cake tins.
- In the bowl of a stand mixer, combine the flour, sugar, baking powder, salt, and spices.
- Using the paddle attachment to slowly stir them together, while you prepare the wet ingredients.
- In another bowl, combine the eggs, oil, milk, pumpkin puree, and vanilla extract.
- Use a whisk to bring everything together and create a smooth texture.
- Add about half of the wet ingredients to the stand mixer, and combine on a medium speed.
- Scrape down the bowl, and mix again until everything is an even texture.
- With the mixer on a low speed, slowly pour in the rest of the wet ingredients.
- Crank the mixer up to a medium speed and whip everything together for 30 seconds.
- Scrape down the bowl, and mix again until everything is an even texture.
- Distribute the cake batter evenly between the prepared cake tins.
- Bake for 30-35 minutes, until the tops of the cake are firm.
- Cool the cakes in their tins for 5 minutes, then invert onto a wire rack and peel off the baking parchment.
- Leave to cool completely.
Prepare the buttercream
- To prepare the buttercream, begin by separating the eggs. *Do not throw away the precious egg yolks! Use them to make custards, creme patisserie, ice creams, and curds. You can always use egg whites from a carton, although the meringue will not hold it’s shape quite so well.
- Place the egg whites and sugar into a heatproof bowl, and set over a bain-marie. *I use the bowl of a stand mixer, to make everything easier and less messy.
- Stir gently over a medium heat until the sugar has all dissolved.
- Transfer the bowl onto the stand mixer, then whisk the meringue mixture for about 10 minutes, until cool and thick.
- Set up a piping bag up over glass, and place on a scale. Zero out the scale and place about 140g of the uncooked meringue into the piping bag. Set aside to create the meringue ghosts later.
- Add the butter to the stand mixer, a little at a time, and continue whisking until the buttercream is smooth.
- Once all the butter is nicely incorporated, add the vanilla extract and orange food colouring, and beat again
To assemble the cake
- To assemble the cake, use a smear of buttercream to attach the first cake to your presentation plate.
- Spread a layer of the buttercream on top of the cake, and then place the next cake on top.
- Continue stacking the cakes, and then completely cover the top and sides, saving a little buttercream for piping a border.
- Use a cake scraper, or a palate knife to make the sides and top of the cake as smooth as possible. *Don’t make yourself crazy over this - perfection is unattainable!
- Chill the cake for at least 30 minutes in the fridge, while you make the meringue ghosts and prepare the chocolate trees.
Make your meringue ghosts & spooky forest
- Take your piping bag full of meringue, and snip off the top at about a 1cm width.
- Pipe 7 ghosts onto a lined baking sheet, using a large blob for the base, and a smaller blob for the head.
- Simply pull the piping bag directly upwards to create the pointy heads.
- Place the baking sheet into a cold oven and set the temperature to 75c, and leave for 1-2 hours.
- The meringues should be crisp on the outside, and like a marshmallow inside.
- Leave to cool completely on the baking sheet.
- Melt the chocolate in the microwave in short bursts, stirring well. Transfer the melted chocolate to a piping bag.
- Cut out a piece of baking parchment 70cm long, and about 15cm high.
- Measure the height of your cake, and draw a line on the back of your baking parchment, just so you can get an idea how it will look.
- Snip the tip off your piping bag, and pipe the cooled melted chocolate onto the parchment to create some tree shapes. *Spooky trees tend to be gnarled and twisted, so the more bendy the trunks, the better!
- Remove your chilled cake from the freezer and carefully lift the parchment onto it, chocolate facing inwards.
- At the overlap, allow one side to touch the cake completely, and the other to go over the top.
- Place your cake back into the fridge to allow the chocolate to set up completely - about 30 minutes.
- While you’re waiting, use some black food colouring to paint little faces on your meringue ghosts. *I like to make a mixture of emotions - happy, sad, surprised, and scary!
- Remove the cake from the fridge, and carefully peel back the overlapping paper.
- Use a sharp knife to cut away the chocolate at the join, until you can safely peel back the rest of the paper.
- Pipe a border around the bottom of the cake to finish, and to hide any little mistakes!
- Place your meringue ghosts on top of your cake in any pattern you like.
And voilà - a haunted forest spiced pumpkin halloween cake - perfect for Halloween!